Introduction of MS Word
Microsoft Word 2021 will sharpen your insight to understand basic commands that are available on MS Word 2021 and diverse navigation tools, as well as the autocorrect option, paragraph formatting, character formatting (text and fonts), line spacing option, styles and themes application, and also a means of using cut, copy, and paste commands. the Working with new features such as Graphic and 3D image and shape, not just inserting the image but designing and manipulating the image to your taste, you can as well put the image into the shape to fill the shape and you can as well insert text to the shape filled with the image and even set the alignment and direction of the text within the shape and image .

Furthermore, MS Word 2021 will bring at your disposal what it takes to work with various MS Word tools, such as the backstage view option, adding page numbers to MS Word documents, discovering and amending spelling mistakes, adding and customizing headers and footers, discovering and correcting grammar mistakes, and lastly, how to add rulers within the MS Word. MS Word 2021 offers you new and better ways of working with documents, such as side-by-side navigation, translators, compound equations, and more new features as listed in this guide.
Launching into MS Word 2021
Launching is a way of starting a program or an application MS Word. There are various ways of launching the MS Word 2021 application, but we will be talking about the two ways mostly used, which are:
Starting MS Word with the Start Menu
To start MS Word 2021 with the start menu, kindly:
- Click on the start menu and locate the program (Microsoft Word or Microsoft Word 2021)
- Right-click on it and select More from the drop-down list, then pick “Pin to taskbar” from the more drop-down list. MS Word Immediately, the concerned program will be pinned to the taskbar.
- In the subsequent time, when you want to launch into the program again, just single-click on its icon

Create a New Document in MS Word
- Click on the blank document, provided you have not been using the program before.
- If you have been using the program before, click on the File menu.
- Then Click on New
Alternatively, after you have opened the Word main screen, press Ctrl + N on the keyboard for new document shortcuts.
To start from the template, simply click on any template of your choice from the available template, and it will be opened up MS Word.
A document can be created either from the blank document or from the various available templates that are available on MS Word 2021. After you are done creating the document, you can store such a document on your PC.MS Word To create the document from a blank document after you have launched into the program, then:
Observing MS Word Start Screen
Immediately, you launch Microsoft Word 2021. The first screen you will notice is known as the start screen. You can perform various activities with the start screen Microsoft word, as listed below.
-
- Click on the blank document, provided you have not been using the program before.
- If you have been using the program before, click on the File menu.
- Then Click on New
Alternatively, after you have opened the Word main screen, press Ctrl + N on the keyboard for new document shortcuts.
To start from the template, simply click on any template of your choice from the available template, and it will be opened up.
Observing MS Word Main Screen
The main screen shows the principal components of the Microsoft Word 2021 interface. Let us delve into those components:
- The title bar: the title bar will show the name you use to save your document; the default name is document 1 if you have not used any name to save your document at all.
- Quick Access toolbar: MS Word contains a quick element that you can use to extract commands out of the available toolbar, such as On/Off, save, undo, redo, etc.
- Tab: a particular title or name given to each group of the ribbon.
- Ribbon: MS Word shows a group of connected commands under each tab.
- Command group: MS Word represents the gallery of related tools within tabs; for instance, within the Home tab, you will be having Editing, Fonts, Paragraph, and so on.
- Horizontal Ruler: It is mainly used for measuring working areas horizontally.
- Vertical Ruler: MS Word it is used for measuring the working area vertically.
- Cursor pointer: it is where your typing entry will start from.
- Scroll bar: it is used to scroll up and down within the document.
- Working area: MS Word this is the largest area on the main screen, it is the area that will accommodate all your text entries
- Status bar: MS Word gives an exact description of your documents, such as the number of pages and words.
The view option: MS Word view option shows the current view option, such as read mode, print layout, and web layout.
- Zoom slider: it is used to adjust (increasing or reducing) the size of the window screen.
Tabs and Ribbons in MS Word
The essential aspect of the Word main screen is that of tabs and ribbons because that is where all MS Word commands reside and are used. Each Word instrument is organized into tabs and ribbons; to perform any action, you will have to click on the tabs where the group of related ribbons informs of the tool is kept, then click on each ribbon to initiate an action.
Note: If you do not know the work of the ribbon, scan the ribbon by putting the cursor on top of the ribbon, and there will be a note of MS Word what the ribbon entails or does in its front.
- The button or menu always has a downward-pointing arrow indicating there are more tools inside;MS Word access them by clicking on the arrow.
- The dialog box has various group functions, such as font, paragraph, style, etc. Please click on each right arrow to check the available group function in each dialog box.
- The file tab is known to be a backstage tab; when you click it, it will take you out of the main screen. When you are done with the file command, click the back arrow to return you to the main screen.
Ribbon Display Option (Hide and Unhide Ribbon)
The ribbon display option is used to adjust the option of a ribbon display to suit your preference; MS Word perhaps you want to create a lot of space for your working area, and thus, you may choose to hide the Ribbon or tab it depends. Ribbon display options are located at the top right corner of the Word window, and it gives out 3 options when you click it, which are;
- Auto-hide Ribbon: when you click on it, MS Word hides both the tab and the ribbon.
- Show tabs: it shows the tabs command and hides the ribbon command (but it is temporary as you click on it).
- tabs and commands: MS Word shows both tab and ribbon commands at once (some users preferred this as the best ribbon option).

Adjusting Ribbon Features on Tablet Mode
The ribbon feature can be adjusted provided you have switched from desktop to tablet mode. MS Word feature is simply the distance between the ribbons. Check below steps for ribbon space adjustments.
- Click on the Customize Quick Access Toolbar button.
- Select the Touch or Mouse mode to activate it.
- Move to the right side of the (CQAT) and select either mouse or touch mode.
Note: When you select the mouse option, MS Word will create little space between ribbons, but the touch option will create more space between the ribbon
Adjusting Document View Mode in MS Word
MS Word gives you the privilege to adjust your document view mode to suit your preferences in the desktop window. It simply helps you view each part of your document so you can adjust them as necessary. MS Word normal mode is the print layout, which is the default way Word offers its document, placing a document on the screen with its four sides at the middle of the screen. MS Word exposes the exact copy of what you will be having as a hard copy when you eventually print or broadcast the document. Let us examine the remaining view mode aside from print layout.
- Web layout: MS Word offers documents in the format of the web page by occupying the whole window screen.
- Read mode: Read mode presents the document in the format of the eBook; MS Word hides almost all the tabs and ribbon except the file tabs.
- Draft: this is the mode that allows seeing the plain text of the document; it hides certain formatting options such as header and footer and other objects.
- Outline: as its name denotes, MS Word outlines the document by arranging it by creating the actual heading and paragraph within the document.
- There are two ways to switch between view modes, which are:
- Window screen switching: you can switch between print layout, web layout, and read mode by touching any of the three modes located at the bottom right of the MS Word window.
- Using the View tab: this grants you the opportunity to switch between any of the available modes, including draft and outline, Simply Click on the View tab and click on any desired mode button.
using ZOOM Slider To Increase Or Reduce The Appearance of the Text
Zoom sliders help adjust the appearance of the text without unnecessarily increasing the size of the text. MS Word zoom magnification gives you the actual picture of how you want your text without adjusting the exact size of the text. MS Word fastest way of zooming the text is to make use of the Zoom slider at the lower right corner of the program window by adjusting the zoom magnification to the right to make the text larger and to the left to make the text smaller.
To set the Accurate Zoom Size
- Click on the percentage zoom button to open the zoom slider dialog box.
- Set the actual percentage by clicking on any of the percentage zoom text listed or you type it into the percentage text box if what you want is different from the one listed.
- You can as well set the zoom text with page width, text width, and other criteria.
Note: For the desktop or laptop with the external mouse that has a wheel button, you can zoom the text by holding down the Ctrl button on the keyboard and keep rolling the mouse wheel up and down to zoom in and out respectively.
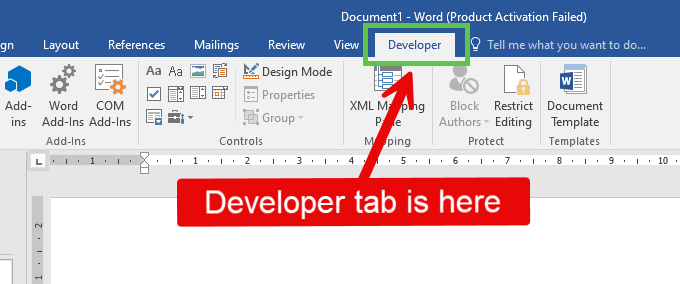
Where Is My Developer Tab?
The developer tab is a hidden tab by default, and it is useful in creating an application, various design forms, and so on. MS Word majority of users do say my MS Word version does not have a developer tab. To command the developer tab out of its hidden place, observe the following processes:
- Click on the File tab and pick Option from the backstage to open the MS Word Options dialog box.
- Choose customization ribbon from the left side of the box.
- Select the Developer tabs and tap OK.
Sorting the Text in MS Word:
Sorting means an arrangement of a thing in a particular order MS Word. Sorting can sort an item or the text automatically for you. To sort the text, do well to:
- Put each item in a separate line and select them as a group.
- Click on the Home tab and move to the paragraph section.
- Click on Sort commands to open the Sort dialog box.
- Select ascending or descending depending on the order you prefer, and tap the ok button.
Side to Side Movement On a Page
Do not mix it up. MS Word permits you to open a single document and divide it into two so that you can view two sides of the document on a page at once. To switch to side-to-side mode, kindly
- Click on the View tab and move to the page movement section.
- Tap on the “side to side” command, and instantly the window will be divided into two, MS Word viewing two pages of a single document side by side.
Note: The Zoom slider will not be available during side-to-side movement.
Protecting Your Document in MS Word
The best means of restricting frustration is to adequately secure the document from other people, most times if it is a family or joint desktop. MS Word secure your document to a greater level, do well to:
- Click on the file and select Info from backstage.
- Click on the Protect document menu and select the best option preferable to you.
- Supply the information required in respect of the option you selected and tap Ok.
Note: Take caution with whatever option you select, if you are locked out of the document, you have no other option to access the document again.
Acceleration (The Power of Alt Key)
There is nothing much faster than knowing how to use keyboard shortcuts offhand, however, Ribbon shortcuts are not easy to store to the head, but you can command those shortcuts to come and make use of them. MS Word send tab key a shortcut errands, do well to:
- Press the Alt key, immediately you touch the Alt key, shortcut letter(s) will come over each ribbon, give clue to the letter to press to access them.
- Click on the respective letter or number of each ribbon you want to access.
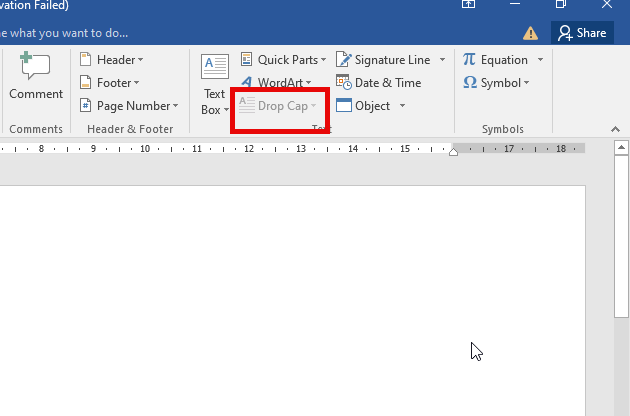
Using the Drop Cap in MS Word
MS Word drop cap is good for designing the first letter of the line, paragraph, or page so that it will be bigger and distinct from every other character in its respective group. To achieve a drop cap, kindly:
- Type the sentence, paragraph and select the first letter of the first word.
- Click on the Insert tab and move to the text group.
Click on the drop-cap menu and select the perfect style.
Note: ensure the paragraph or sentence is fully justified.
Compound Equation in MS Word
You can perform complex mathematical equations such as polynomials, binomials, and other equations to achieve this, simply:
- Click on the Insert tab and move to the symbols section far right of the screen.
- Click on the equation button and select the equation you want to use from the list; MS Word equation will come up from the spot where you placed the cursor pointer.
- Then change the equation format by using the numbers to replace the letter.
Autosave With Auto Recover:
MS Word has Auto Recover to recover the unsaved files, but it may not fail you if you fail to set it up accurately. MS Word to set Auto Recover to save the unsaved file, kindly
- Click on the File and select Option from the backstage to open the MS Word Options dialog box.
- Select Save, then proceed to choose Save Auto Recover Information and set the minutes you want MS word to continue saving the document for you automatically.
- Click Ok and close the dialog box.
Note: MS Word can give you millions of equation formulas but will not calculate for you.
Language Translation in MS Word
You do not have to go to school for linguistics anymore; MS Word has given you the privilege to translate any text written down to another language. To translate a word, phrase and sentence, do well to:
- Write the word, phrase, or sentence you want to translate; for instance, the short lady danced to the beat of the drum MS Word.
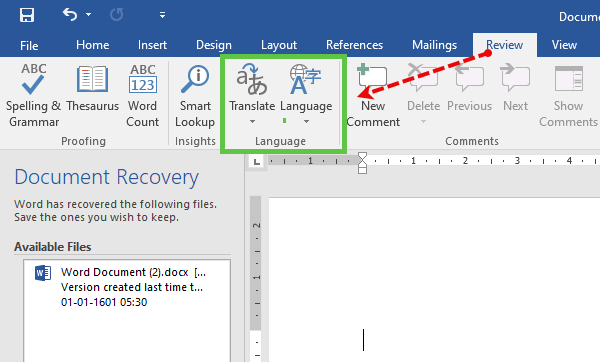
- Select the text, then click on the Review tab and move to the language section.
- Click on the “translate menu” and select translate selection.
- Check the translation result and insert it into the document if that is the purpose for which you use the translation application.
- Click on the X button to close the translate pane.
Note: Do not expect the exact translation to the local language; you will only get a translation that is almost close to the language you are translating to; in short, you will get the translation approximation.